Overview: Building a Messenger with ADAPT
This tutorial provides a step-by-step guide to constructing a messenger using the ADAPT framework. The primary focus is on developing a functional messenger application from the ground up.
The tutorial will cover:
- Writing MUFL code essential for the messenger’s core functionality.
- Developing a front-end application to enable user interactions with the ADAPT packet in a browser setting.
- Deployment steps to get the messenger up and running.
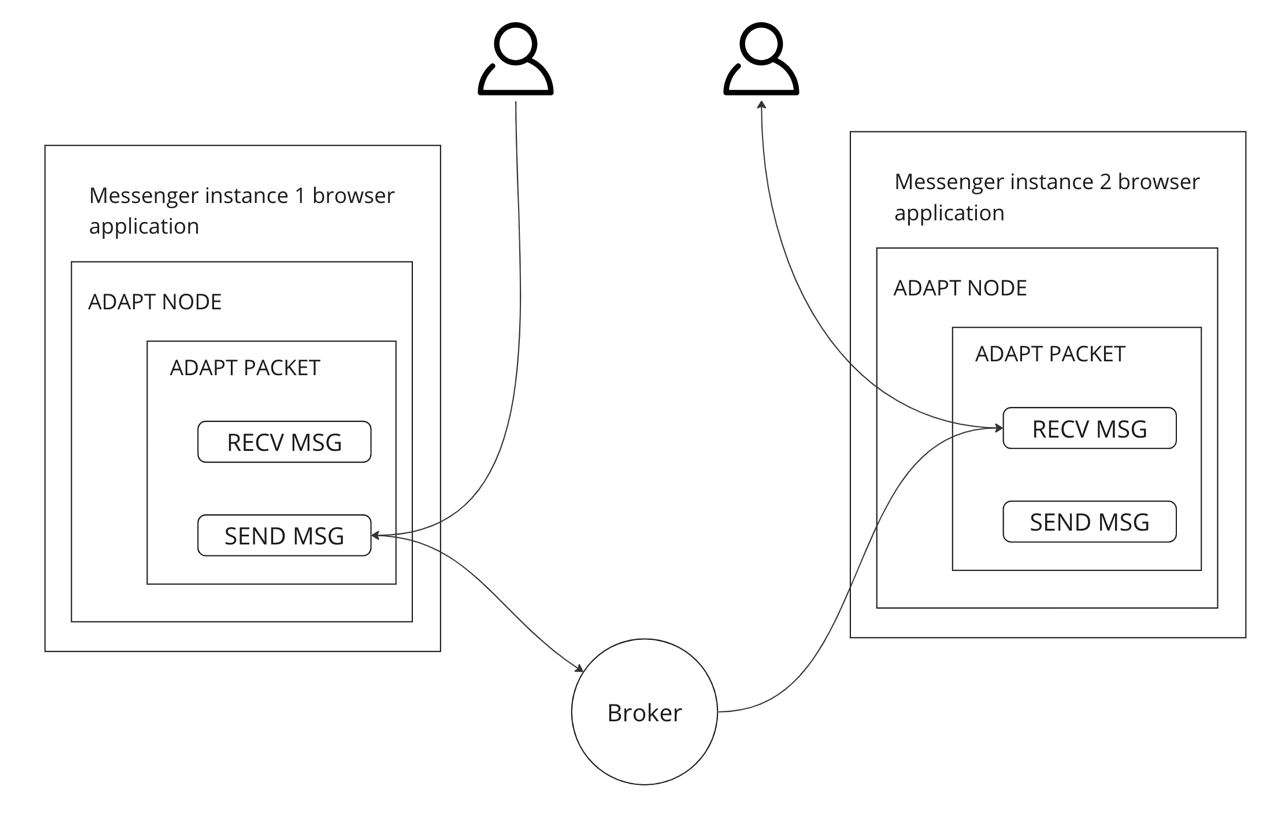
ADAPT serves, specifically, as a data layer from the messenger application. ADAPT packets serve as nodes in a data mesh that implements node-to-node interaction within the messenger infrastructure, enables encryption and key exchange (this will be seen the part 2 of the tutorial) and perform other data and logic-related tasks. ADAPT-based data mesh serves as a decentralized data backed in the messenger application. All front-end interactions with the user are still left to the messenger UI/UX.
In an ADAPT project, the complexity of the MUFL code and the front-end application can vary based on the desired features and design. This guide will demonstrate building a messenger with two ADAPT packets:
- Front-end Packet: This runs in a web browser and has a basic user interface for direct user interactions.
- Backend Packet: This operates as a backend Docker process. It handles message exchanges with the front-end packet without user intervention.
Note: Building a messenger with a few ADAPT packets might seem straightforward, but scaling to a larger number of packets, such as 10,000, with dynamic features, can be complex. It’s crucial to understand the ADAPT framework thoroughly before progressing.
I. Prerequisites
Ensure that Docker and Docker Compose are installed on your system.
docker -v
docker-compose version
If these commands fail, install using the official Docker installation instructions.
II. Write the MUFL Code
When writing MUFL code, there is no need to worry about the network infrastructure or how ADAPT nodes interconnect. The ADAPT framework manages network communication, error resolution, and concurrent control for the developers. This abstraction lets us concentrate on the business logic, producing clearer and more maintainable code.
Our primary goal is to identify our system’s main entities, and then describe their roles and interactions with MUFL code. We aim to construct a basic multi-actor network using ADAPT. Every actor in this network uses the same codebase, equipped to send and receive messages. Interactions are made via a browser-based user interface.
Actor Operations:
-
Sending a message: Users specify the packet ID of the desired recipient actor and the message content.
-
Receiving a message: Upon message receipt, an alert appears in the associated browser application.
This setup demonstrates a peer-to-peer communication model with all actors having identical capabilities.
Now, onto the code.
Create a directory for MUFL code and craft a placeholder for our actor.
mkdir mufl_code
touch mufl_code/actor.mu
Define the tasks for our actor in an application named actor. Below is the skeleton code for our front-end packet:
application actor
{

}
Define the operation that sends the message. In an ADAPT network, the only way for a node to interact with another node is by sending ADAPT messaging protocol messages. For the actor’s packet to send a message to another packet, we need to implement a transaction that sends the message.
A transaction in MUFL is an atomic state-transition operation, which means that it either succeeds or fails entirely. Either all changes are applied or, in the case of an error, no changes are applied at all.
To define transactions in MUFL that enable node-to-node interactions, we must load certain internal libraries. This can be accomplished by appending uses transactions after the name of our application.
Not all applications need this, for example Nested packets might not need to load these libraries.
Now, let’s add a placeholder for our transaction, named send_message. This transaction establishes an end-point to be called by the messenger user interface.
application actor uses transactions
{
    trn send_message message: any
    {

    }
}
The transaction send_message is designed to be invoked via the browser interface. It aims to acquire the recipient’s packet ID and the message content from the user. Once these details are collected, the transaction is responsible for dispatch of the message to the specified recipient.
In MUFL, each transaction can only accept a single argument. This means we cannot pass the message text and the recipient’s packet ID as two separate arguments. Instead, these need to be combined into a single MUFL value. Therefore, the argument type for message should encapsulate both the message and the packet ID.
This is done by placing the recipient’s packet ID and the text of the message into a record. record is a dictionary type in MUFL with defined field names. We can create a type alias for our custom structure using the metadef statement:
metadef message_type: ($data -> str, $packet_id -> global_id).
The code snippet above defines message_type as a record type with two fields. The data field is of str type (string) representing the message text, and packet_id is of the global_id type, a type used for IDs, in our case - the packet ID. This message_type will be used to encapsulate the data for our messaging transactions within the MUFL code.
Consider the following example for better understanding:
metadef message_type: ($data -> str, $packet_id -> global_id).

message1 is message_type = ($data -> "Hello, World!", $packet_id -> _get_container_id()).
message2 = ($data -> "This is a record type!", $packet_id -> _get_container_id()). // You don't need to specify the value type explicitly

_print message1 "\n".
_print message2 "\n".
Here is the result of the code above:
("data"->"Hello, World!","packet_id"->"4DBAA30498D00A62531A0B644BED9A05D9656BCD2F2759F8F389C803E7451A32",)
("data"->"This is a record type!","packet_id"->"4DBAA30498D00A62531A0B644BED9A05D9656BCD2F2759F8F389C803E7451A32",)
The code above uses the _get_container_id primitive function. This function returns the packet ID of the current packet.
Now we can add this type definition to our MUFL application:
application actor uses transactions
{
    metadef message_type: ($data -> str, $packet_id -> global_id).
    trn send_message message: message_type
    {

    }
}
Next, we want to validate the origin of the message to ensure it aligns with our expectations. The current_transaction_info.mm library available in the MUFL standard library gives us additional information about the message. The send_message transaction is expected to be invoked only from the user’s application, meaning its origin is user. To validate, incorporate this logic into our MUFL application:
application actor loads libraries
    current_transaction_info
    uses transactions
{
    metadef message_type: ($data -> str, $packet_id -> global_id).
    trn send_message message: message_type
    {
        // validate the transaction's origin
        current_transaction_info::validate_origin_or_abort (transaction::envelope::origin::user,).
    }
}
The remaining task is to send a message to an actor with the specified packet ID. We can accomplish this by using the transaction::action::send function.
For more details about transaction return options, refer to ADAPT Wrapper Return Values
Let’s incorporate this logic into our code:
trn send_message message: message_type
    {
        // validate the transaction's origin
        current_transaction_info::validate_origin_or_abort (transaction::envelope::origin::user,).

        // extract recipient packet id from the transaction argument
        recipient_id = message $packet_id.

        // extract the message text
        text = message $data.

        return transaction::success [
            transaction::action::send recipient_id (
                $name -> "::actor::receive_message", // specify the name of the transaction that should be invoked in the recipient's packet
                $targ -> text // pass an argument
            )
        ].
    }
Define the operation that receives the message. We can similarly add a second transaction, receive_message, which is responsible for receiving the message from the network and displaying it in the user’s browser application.
application actor uses transactions
{
    metadef message_type: ($data -> str, $packet_id -> global_id).
    trn send_message message: message_type
    {

    }

    trn receive_message message: str
    {

    }
}
Notice that the receive_message transaction takes an argument of the str type. In this context, the recipient’s packet ID is not needed anymore.
However, having information about the message’s origin can be valuable. The receive_message transaction is expected to be invoked from another actor over the network. This type of origin is external. When the transaction is external, we can extract additional information from it. In our case, we particularly want to extract the sender’s packet ID, so that we can identify the sender of the message.
Let’s implement this logic using the current_transaction_info.mm library into our the transaction:
trn receive_message message: str
    {
        // validate the transaction's origin
        current_transaction_info::validate_origin_or_abort (transaction::envelope::origin::external,).

        // extract the sender's packet ID from the transaction envelope
        envelope = current_transaction_info::get_external_envelope_or_abort ().
        sender_id = envelope $from. // envelope is of 'record' type, use reduction to extract the $from field
    }
The remaining task is to implement the receive_message transaction. Here, we need to pass the message to the user’s browser application. We can achieve this using the transaction::action::return_data function, which is used to establish interactions between the ADAPT node and its host application. Subsequently, we will add a handler in the browser application that displays a notification to the user every time the result of the transaction::action::return_data function call is returned from the transaction.
trn receive_message message: str
    {
        // validate the transaction's origin
        current_transaction_info::validate_origin_or_abort (transaction::envelope::origin::external,).

        // extract the sender's packet ID from the transaction envelope
        envelope = current_transaction_info::get_external_envelope_or_abort ().
        sender_id = envelope $from. // envelope is of 'record' type, use reduction to extract the $from field

        return transaction::success [
            transaction::action::return_data ("Received a message: " + message + ", from a packet: " + sender_id)
        ].
    }
Include the required libraries. The last thing we need to do is include all the required libraries in our application to ensure it can run in the ADAPT network. These libraries enable internal calls, manage the packet’s attestation process, and handle many other important aspects of the logic. To achieve this, we simply load the necessary libraries into our application code.
Here is the final version of the code:
application actor loads libraries
    current_transaction_info,
    identity_proof_document,
    attestation_document,
    browser_attestation_document,
    transaction_message_decoder
    uses transactions
{

    metadef message_type: ($data -> str, $packet_id -> global_id).

    trn send_message message: message_type
    {
        // validate the transaction's origin
        current_transaction_info::validate_origin_or_abort (transaction::envelope::origin::user,).

        // extract recipient packet id from the transaction argument
        recipient_id = message $packet_id.

        // extract the message text
        text = message $data.

        return transaction::success [
            transaction::action::send recipient_id (
                $name -> "::actor::receive_message", // specify the name of the transaction that should be invoked in the recipient's packet
                $targ -> text // pass an argument
            )
        ].
    }

    trn receive_message message: str
    {
        // validate the transaction's origin
        current_transaction_info::validate_origin_or_abort (transaction::envelope::origin::external,).

        // extract the sender's packet ID from the transaction envelope
        envelope = current_transaction_info::get_external_envelope_or_abort ().
        sender_id = envelope $from. // envelope is of 'record' type, use reduction to extract the $from field

        return transaction::success [
            transaction::action::return_data ("Received a message: " + message + ", from a packet: " + sender_id)
        ].
    }
}
III. Compile the MUFL Code
In order to compile our MUFL code, we need to add one more crucial element - the MUFL configuration script. This script guides the MUFL compiler to locate dependencies. In our case, all the dependencies we are using are located in the MUFL standard library. Therefore, our configuration script will be fairly straightforward - it simply needs to include the standard library modules.
Here is the basic structure of the configuration script:
config script
{

(
    $imports -> (
        $libraries -> (
            "library_name" -> "path_to_the_library",
        ),
        $applications -> (
            "application_name" -> "path_to_the_application",
        )
    ),

    // the same structure for exports libraries and applications
    $exports -> (
        $libraries -> (,),
        $applications -> (,)
    )
).

}
Create the configuration script. In our case, we could manually specify the paths to the MUFL standard libraries needed for our application in the imports section. However, a simpler solution exists. We can utilize the config_load statement to load the configuration script of the MUFL standard library. Following that, we can include everything that the MUFL standard library configuration contains in the exports section into our imports section. By doing this, all modules from the standard library will be accessible within our application.
config script
{

(
$imports -> ((config_load #$MUFL_STDLIB_PATH) $exports),
$exports -> (
    $libraries -> (,),
    $applications -> (,)
)

).

}
The construct #$MUFL_STDLIB_PATH delivers an environment variable named MUFL_STDLIB_PATH to the MUFL code of the configuration script. During the MUFL compilation process, this construct is replaced with the value stored in the variable.
Compile the code and position the compilation output. Now we can proceed to the compilation process itself. Typically, the compilation process entails calling the MUFL compiler binary with a straightforward compiler configuration. The result of the compilation is a MUFL object file (.muflo), which can then be used to create an ADAPT packet. In our case, we can’t use the binary directly because it resides in a Docker container.
One potential solution is to copy the binary from the Docker container to your local machine. However, this approach isn’t guaranteed to work due to possible architectural differences.
A more reliable alternative is to devise a simple script that loads the MUFL code into the Docker container, compiles the code within that environment, and finally, copies the compiled code back to the host environment.
Now, let’s generate a placeholder file for this script in our project:
touch compile-mufl-code-in-docker.sh
And place the following code into the file:
#!/bin/bash

# Create a new Docker container from the image and initiate a persistent process within the container
id=$(docker run -d adaptframework/mufl:release-0.2 "tail -f /dev/null")

# Transfer the MUFL code into the Docker container
docker cp ./mufl_code $id:/mufl_code

# Execute the Docker container with the command to compile the MUFL code
# Observe here that we are defining the environment variable for our configuration script
docker exec $id bash -c "cd /mufl_code/ && MUFL_STDLIB_PATH=/mufl/mufl_stdlib /mufl/bin/mufl-compile -mp /mufl/meta -mp /mufl/transactions ./actor.mu"

# Retrieve the compiled MUFL file back from the Docker container to the local machine
docker cp $id:/mufl_code ./

# Terminate the container after compilation
docker stop $id

# Erase the container
docker rm $id
Finally, let’s grant executable permissions to the file and run the script:
chmod u+x ./compile-mufl-code-in-docker.sh
./compile-mufl-code-in-docker.sh
After executing the script, you should find the compiled MUFL object file in the mufl_code directory. This file will have the .muflo extension.
You can verify this by running:
ls mufl_code/*.muflo
The output should look something like this:
mufl_code/09EC8E66CCDDE8B7F1EDA7BE54B4AF60C6D5DA54623B56092334DED3ABEFC3EE.muflo
The filename is composed of a hash derived from the code itself. This ensures that using the same version of the compiler and the same code will always yield the same hash code for the output file. Consequently, you should obtain the same file when you perform this operation.
Now that the MUFL code is written and compiled, let’s explore how to execute this code in a browser environment. To do this, we will create a simple web application.
IV. Set up the Front-End Development Environment
Before diving into the implementation of the web application itself, we need to properly set up our development environment. Doing so enables us to build, run, and test our web application effectively.
ADAPT TypeScript packages are only available in the ADAPT Docker development kit. To develop our application, we need to copy it into a Docker container and run it from there. This process entails creating a simple Dockerfile to define our project’s structure.
Create a placeholder Dockerfile.
touch Dockerfile
Copy this content to the Dockerfile.
FROM ubuntu:20.04

LABEL description="ADAPT hello world project example" maintainer="[email protected]"

USER root
WORKDIR /
ENV TZ UTC
ENV DEBIAN_FRONTEND noninteractive

SHELL ["/bin/bash", "-c"]
ENTRYPOINT ["/bin/bash", "-c"]
CMD []

# Install npm and nodejs to the Docker image
RUN apt update && apt install -y sudo curl && \
curl -fsSL https://deb.nodesource.com/setup_current.x |bash - && \
apt-get install -y nodejs

# Copy ADAPT Docker toolkit to our Docker image
COPY --from=adaptframework/mufl:release-0.2 /mufl /mufl

# Build ADAPT TypeScript modules
RUN cd /mufl && sh build-nodejs-modules.sh

# Copy our web application to the Docker image
COPY ./adapt-hello-world-example/web/ /src/web

# Copy our MUFL code to the Docker image
COPY ./adapt-hello-world-example/mufl_code /src/mufl_code

# Build the web application
RUN cd /src/web && npm i && npm run build
The source code resides at https://github.com/adapt-toolkit/basic-messenger-demo.
When we use this Docker image to run our project using the docker-compose utility later on, the code:
- Copies the ADAPT Docker development kit to the
/mufldirectory. - Builds the ADAPT TypeScript modules using a special script available in the ADAPT development toolkit.
- Copies our web application and MUFL code into the Docker image.
- Builds the web application.
V. Develop the Front-End Application
Let’s start building our front-end application.
Initialize a template React project.
npx create-react-app web --template=typescript
cd web
This creates a project that is immediately ready to build.
Build the project, start a front-end development server, and run the application in a browser.
npm run build
npm start
Add the dependencies. Now that everything is set, we can add the ADAPT TypeScript utilities as a dependency to our project. This TypeScript package can be found at /mufl/utilities/ in the ADAPT Docker development kit. To add the dependency, simply include it in the dependencies field in the package.json file.
{
    "dependencies": {
        "adapt_utilities": "file:../../mufl/utilities"
    }
}
Note the path of the TypeScript package. This path is dependent on the project structure defined in the Dockerfile we created earlier. Because the ADAPT toolkit is located at /mufl/ and our web application is at /src/web/, the relative path from our web application to the ADAPT toolkit is ../../mufl.
Let’s modify a few more things in the package.json file. Insert the following code in the scripts section:
{
    "scripts": {
        "start": "BROWSER=none PORT=8080 react-scripts start",
        "copy-protocol-packet": "mkdir -p ./public/static/mufl && cp ../../mufl/addon/addon_wrapper/mufl_files/*.muflo ./public/static/mufl/",
        "copy-wasm": "mkdir -p ./public/static/wasm/ && cp ../../mufl/addon/adapt_js_wasm/src/*.wasm ./public/static/wasm/",
        "copy-muflo": "mkdir -p ./public/static/mufl && cp ../mufl_code/B94412BA2BAE45913AD0425FB96AEAFBE1A56CBF75E293AC2E364ACD49E2E9B7.muflo ./public/static/mufl/",
        "build": "tsc -b && npm run copy-wasm && npm run copy-muflo && npm run copy-protocol-container && react-scripts build"
    }
}
We made a few modifications to the start script to prevent it from opening a browser page upon starting the server. This is necessary because we’re going to manually modify the URL parameters to enable the running of multiple ADAPT nodes in our browser.
For the purposes of the demo it is assumed that the reader will be messaging themselves
We have also added three new commands - copy-protocol-packet, copy-wasm, and copy-muflo - which help copy essential files for our project. The copy-protocol-packet command copies the compiled MUFL code object file from the ADAPT development kit. The protocol packet controls communication between packets in the network. The copy-muflo command copies the compiled MUFL code object file that we created earlier. Finally, copy-wasm copies the WebAssembly module that contains the C++ core implementation of the ADAPT JS API.
We have also altered the build script to copy all the files discussed above before running the original script.
Write the source code for our web application.
We will only need to modify two files in the project: src/App.tsx and src/App.css.
Given our previous discussion, we want our application to gather information from the user, namely the recipient packet ID and the message. The application should then invoke the send_message transaction in the MUFL application, passing the recipient packet ID and the message as arguments to the transaction. Therefore, the interface of the application should contain two input text fields (one for the packet ID and one for the message), as well as a send button to invoke the transaction and send the message to the other packet. Additionally, when the MUFL application receives a message from another packet, our web application should show a notification to the user indicating that the message has been received, and display the message. Finally, we should be able to view our ADAPT packet ID so that other actors in the network can send messages to us.
Let’s summarize what the interface should include:
- Our packet ID
- Two input fields for the packet ID and the message
- A
sendbutton - A notification that appears when a message is received
Now, let’s draft a version of the code that includes placeholders for corresponding functions.
const App: React.FC = () => {

    // Use the useState pattern to define variables
    // that will hold the state of our app
    const [packetId, setPacketId] = useState<string>('A packet is loading'); // Placeholder value until the packet is loaded
    const [recipientId, setRecipientId] = useState<string>(''); // Holds the ID of the recipient packet
    const [message, setMessage] = useState<string>(''); // Holds the message to be sent
    const [notification, setNotification] = useState<string>(''); // Holds the content of the notification message

    const onButtonClick = () => {
        // Function to be called when the Send button is clicked
        // Will invoke the `send_message` transaction in the MUFL application
    }

    const makeNotification = (text: string) => {
        // Function to display the notification to the user
    }

    useEffect(() => {
        // This function is executed just once when the page is loaded
        // Use it to initialize ADAPT and create a packet
    }, []);

    // Render our app
    return (
        <div className="container">
            <p>Your packet ID is: {packetId}</p> {/* Show our packet ID */}
            <input
                type="text"
                placeholder="Recipient ID"
                value={recipientId}
                onChange={e => setRecipientId(e.target.value)} // Update the recipientId variable when the input field changes
            />
            <input
                type="text"
                placeholder="Message"
                value={message}
                onChange={e => setMessage(e.target.value)} // Update the message variable when the input field changes
            />
            <button onClick={onButtonClick}> {/* Set the onButtonClick function to be called when the button is clicked */}
                Send Message
            </button>
            {notification && <div className="notification">{notification}</div>} {/* Display the notification if there is one */}
        </div>
    )
}

export default App;
This draft code provides a basic structure for your app. It allows for the input of the recipient ID and message, as well as sending the message upon clicking the button. It also sets the groundwork for displaying the packet ID and notifications, but the functionality needs to be implemented in the useEffect, onButtonClick, and makeNotification functions.
We are now ready to implement the useEffect function in our draft code. The function’s primary responsibility is to initialize ADAPT and to create a packet.
ADAPT integrates with your browser application via the adapt_wrapper_browser utility provided in the ADAPT Docker development kit. This utility runs the ADAPT wrapper in your browser code, where it can manage multiple ADAPT packets. The ADAPT wrapper’s role is to connect the MUFL application with other network participants. It does so by establishing a connection with the message broker and managing the packet’s state. In certain environments, such as AWS Nitro Enclaves, the ADAPT wrapper has the added responsibility of saving the packet’s backup data and enabling packet restoration when needed.
The ADAPT wrapper’s functionality is broad. For more information, refer to ADAPT Wrapper Overview.
To create a packet within the ADAPT wrapper, you must supply a configuration to it, defining which packets are to be created. Creating every packet requires a compiled MUFL code object and a seed phrase. This seed phrase is a unique string used as a salt during packet creation and is used as a seed for the internal pseudo-random generator of the packet.
In order to generate different packets from the same MUFL code we crafted earlier, we need the ability to provide distinct seed phrases. One way to accomplish this is by passing the seed phrase as a URL parameter, just for the purpose of this tutorial.
Here is the code:
useEffect(() => {
    // This function is executed just once when the page is loaded
    // Use it to initialize ADAPT and create a packet

    // Extract the current URL search parameters
    const urlSearch = window.location.search;
    const urlParams = new URLSearchParams(urlSearch);

    // Extract the seed phrase from URL parameters. This unique string is used for creating a packet
    const seed_phrase = urlParams.get('seed');

    // Define the arguments needed for the adapt_wrapper_browser start function
    const args = `--broker_address ws://127.0.0.1:9001 --logger_config --level ERROR --logger_config_end --packet --unit_hash B94412BA2BAE45913AD0425FB96AEAFBE1A56CBF75E293AC2E364ACD49E2E9B7 --unit_dir_path /static/mufl/ --seed_phrase ${seed_phrase}`;

    // Start the ADAPT wrapper in the browser
    adapt_wrapper_browser.start(args.split(" ")).then(adapt_wrapper => {
        // Set a callback function that will be executed when the packet is created
        adapt_wrapper.on_packet_created_cb = (packet_id, packet_wrapper) => {
            // packet_wrapper is the ADAPT packet wrapper managing the ADAPT application
            // Save the packet wrapper and the packet ID to the component state
            setAdaptPacketWrapper(packet_wrapper);
            setPacketId(packet_id);

            // Set a callback function that will be executed when the packet returns data
            packet_wrapper.on_return_data = (data: adapt_js_api.AdaptValue) => {
                // Visualize the data and show a notification with the received message
                const message = data.Visualize();
                makeNotification(message);
            }
        }
    })
}, []);
Note that the function above saves the ADAPT packet wrapper to the variable, which is why we need to keep track of it in the application state. This is accomplished using the useState hook.
Here is the additional useState construct for the ADAPT packet wrapper:
const [adaptPacketWrapper, setAdaptPacketWrapper] = useState<adapt_wrappers.AdaptPacketWrapper | undefined>() // Holds the adapt packet wrapper
ADAPT packet wrapper is a TypeScript component provided within the ADAPT Docker development kit. Its primary role is to manage a single ADAPT packet. The management of an ADAPT packet includes handling its state, invoking transactions within the packet, and processing the outcomes of those transactions. Essentially, the wrapper makes an ADAPT packet into an ADAPT network node.
The subsequent function to be implemented is the onButtonClick function. Upon triggering this function, by clicking the send button on the user interface, the send_message transaction in the packet managed by the ADAPT wrapper within your web application is invoked. This function leverages the ADAPT JS API to create the transaction that the MUFL application will process.
const onButtonClick = () => {
    // Function to be called when the Send button is clicked
    // Will invoke the `send_message` transaction in the MUFL application

    // We first check if the ADAPT packet has been properly initialized
    if (!adaptPacketWrapper) {
        // If not, we notify the user about an internal error and stop further execution
        makeNotification("Internal error: ADAPT packet is not initialized.");
        return;
    }

    // If the ADAPT packet has been initialized, we form the transaction
    // We use the utility `adapt_js_api_utils.object_to_adapt_value` to convert our JavaScript object
    // into a MUFL value
    // Here, we're defining a transaction `::actor::send_message`
    // and setting the transaction argument which include the recipient's packet ID and the message
    const trn = adapt_js_api_utils.object_to_adapt_value({
        name: "::actor::send_message",
        targ: {
            packet_id: recipientId,
            data: message
        }
    });

    // Finally, we add this transaction to the ADAPT wrapper message queue
    adaptPacketWrapper.add_client_message(trn);
}
Finally, we can implement a simple makeNotification function.
const makeNotification = (text: string) => {
    // Function to display the notification to the user

    setNotification(text);
}
Here is the complete code of the src/App.tsx file:
import React, { useEffect, useState } from 'react';
import './App.css';
import {adapt_wrapper_browser, adapt_js_api, adapt_wrappers, adapt_js_api_utils} from "adapt_utilities"


const App: React.FC = () => {

    // Use the useState pattern to define variables
    // that will hold the state of our app
    const [packetId, setPacketId] = useState<string>('A packet is loading'); // Placeholder value until the packet is loaded
    const [recipientId, setRecipientId] = useState<string>(''); // Holds the ID of the recipient packet
    const [message, setMessage] = useState<string>(''); // Holds the message to be sent
    const [notification, setNotification] = useState<string>(''); // Holds the content of the notification message

    const [adaptPacketWrapper, setAdaptPacketWrapper] = useState<adapt_wrappers.AdaptPacketWrapper | undefined>() // Holds the adapt packet wrapper

    const onButtonClick = () => {
        // Function to be called when the Send button is clicked
        // Will invoke the `send_message` transaction in the MUFL application

        // We first check if the ADAPT packet has been properly initialized
        if (!adaptPacketWrapper) {
            // If not, we notify the user about an internal error and stop further execution
            makeNotification("Internal error: ADAPT packet is not initialized.");
            return;
        }

        // If the ADAPT packet has been initialized, we form the transaction
        // We use the utility `adapt_js_api_utils.object_to_adapt_value` to convert our JavaScript object
        // into a MUFL value
        // Here, we're defining a transaction `::actor::send_message`
        // and setting the transaction argument which include the recipient's packet ID and the message
        const trn = adapt_js_api_utils.object_to_adapt_value({
            name: "::actor::send_message",
            targ: {
                packet_id: recipientId,
                data: message
            }
        });

        // Finally, we add this transaction to the ADAPT wrapper message queue
        adaptPacketWrapper.add_client_message(trn);
    }

    const makeNotification = (text: string) => {
        // Function to display the notification to the user

        setNotification(text);
    }

    useEffect(() => {
        // This function is executed just once when the page is loaded.
        // We will initialize ADAPT and create a packet here.

        // Extract the current URL search parameters.
        const urlSearch = window.location.search;
        const urlParams = new URLSearchParams(urlSearch);

        // Extract the seed phrase from URL parameters. This unique string is used for creating a packet.
        const seed_phrase = urlParams.get('seed');

        // Define the arguments needed for the adapt_wrapper_browser start function.
        const args = `--broker_address ws://127.0.0.1:9001 --logger_config --level ERROR --logger_config_end --packet --unit_hash B94412BA2BAE45913AD0425FB96AEAFBE1A56CBF75E293AC2E364ACD49E2E9B7 --unit_dir_path /static/mufl/ --seed_phrase ${seed_phrase}`;

        // Start the ADAPT wrapper in the browser.
        adapt_wrapper_browser.start(args.split(" ")).then(adapt_wrapper => {
            // Set a callback function that will be executed when the packet is created.
            adapt_wrapper.on_packet_created_cb = (packet_id, packet_wrapper) => {
                // packet_wrapper is the ADAPT packet wrapper managing the ADAPT application
                // Save the wrapper and the packet ID to the component state.
                setAdaptPacketWrapper(packet_wrapper);
                setPacketId(packet_id);

                // Set a callback function that will be executed when the packet returns data.
                packet_wrapper.on_return_data = (data: adapt_js_api.AdaptValue) => {
                    // Visualize the data and show a notification with the received message.
                    const message = data.Visualize();
                    makeNotification(message);
                }
            }
        })
    }, []);

    // Render our app
    return (
        <div className="container">
            <p>Your packet ID is: {packetId}</p> {/* Show our packet ID */}
            <input
                type="text"
                placeholder="Recipient ID"
                value={recipientId}
                onChange={e => setRecipientId(e.target.value)} // Update the recipientId variable when the input field changes
            />
            <input
                type="text"
                placeholder="Message"
                value={message}
                onChange={e => setMessage(e.target.value)} // Update the message variable when the input field changes
            />
            <button onClick={onButtonClick}> {/* Set the onButtonClick function to be called when the button is clicked */}
                Send Message
            </button>
            {notification && <div className="notification">{notification}</div>} {/* Display the notification if there is one */}
        </div>
    )
}

export default App;
Let’s now arrange the elements on our interface by adding some styling. The simple src/App.css file provided below serves this purpose
.container {
  display: flex;
  flex-direction: column;
  justify-content: center;
  align-items: center;
  height: 100vh; /* make container take up full viewport height */
  gap: 10px; /* create space between elements */
  text-align: center; /* center text horizontally */
}

.notification {
  position: absolute;
  top: 0;
  width: 100%;
  padding: 10px;
  color: black;
  background-color: yellow;
  text-align: center;
}

input {
  padding: 5px;
  margin-bottom: 10px;
  width: 300px;
}

button {
  padding: 10px 20px;
}
VI. Run the Project
With the front-end code now fully implemented, we can run the application using the docker-compose utility. To execute our project, we need to craft a docker-compose.yml file that will coordinate the Docker containers.
Our application requires two Docker containers: one for the frontend development server and another for the message broker. The message broker, part of the ADAPT Docker development kit, is a network component written in TypeScript. It serves to relay messages between different ADAPT wrappers, thereby enabling communication between ADAPT packets. The /mufl/utilities/executables/dist/broker.js script, along with a valid configuration, is needed to run the message broker.
To launch our application in the browser, navigate to the appropriate URL, making sure to include a unique seed phrase as an URL parameter. Although it is possible to create as many actors in the network as desired, it’s essential to use a unique seed phrase for each when running ADAPT in test mode. Failure to do so might result in multiple packets with the same ID, leading to unexpected application behavior. In a production environment, a random entropy should be used during packet creation, which ensures the uniqueness of each packet ID, even if the same seed phrase is reused.
Here is the docker-compose.yml file:
version: '3.8'

x-service: &service
  logging:
    driver: json-file
    options:
      max-size: "100m"
      max-file: "2"
  restart: "no"
  image: basic-messenger-demo
  entrypoint: ["/bin/bash", "-c"]

services:

  broker:
    <<: *service
    ports:
      - "9001:9001"
    command:
    - >
      node  /mufl/utilities/executables/dist/broker.js
      --host 127.0.0.1 --port 9001 --test_mode --logger_config
      --level DEBUG --print_callstack ERROR --logger_config_end

  web:
    <<: *service
    ports:
      - "8080:8080"
    command:
    - >
        cd /src/web && npm start
In this configuration, the message broker’s parameters define where the HTTP server will initiate (that is, the host and port). Also included is the logger configuration — here, it is set to DEBUG level for comprehensive logging. However, you can decrease the log level to ERROR to minimize the size of the logs. If the print_callstack argument is set to the ERROR level, the message broker will print the entire call stack for all error logs. This feature aids developers in identifying the source of errors within the code.
To run the application, simply enter the following commands in your terminal:
docker build . -t basic-messenger-demo
docker-compose up
Next, open a web browser and enter the following URL:
localhost:8080/?seed=custom_seed_phrase
Feel free to replace custom_seed_phrase with any seed phrase you prefer. Remember, each seed phrase represents a unique actor within the network.
You can now create as many actors as you desire by repeating the process of opening a new page in your browser and using a unique seed phrase as an URL parameter.
VII. Debug the Application
This section provides a hands-on demonstration of our application’s functionalities and operation.
Upon launching the application in your browser, you encounter this initial layout:
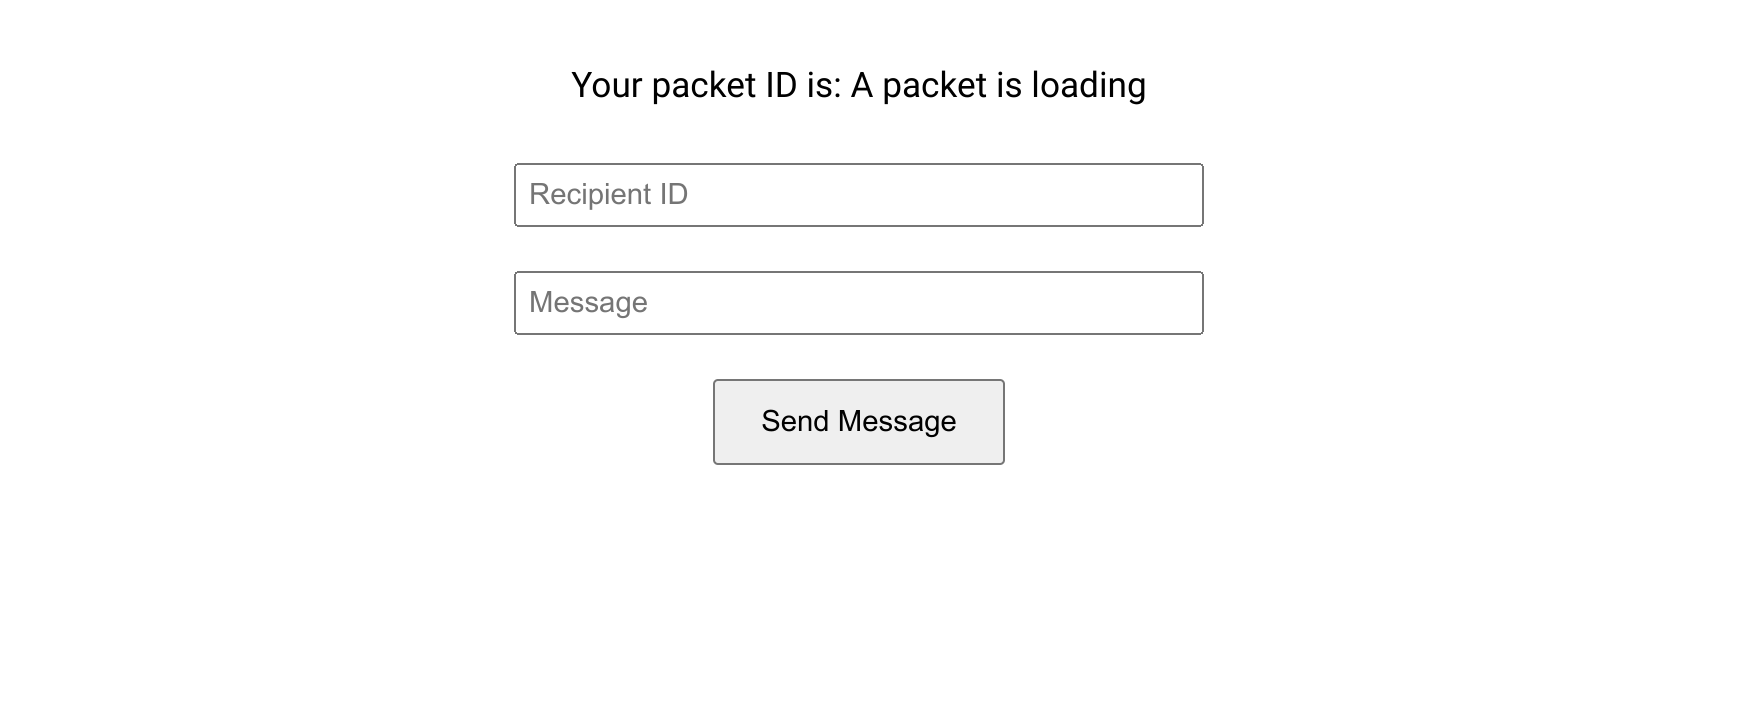
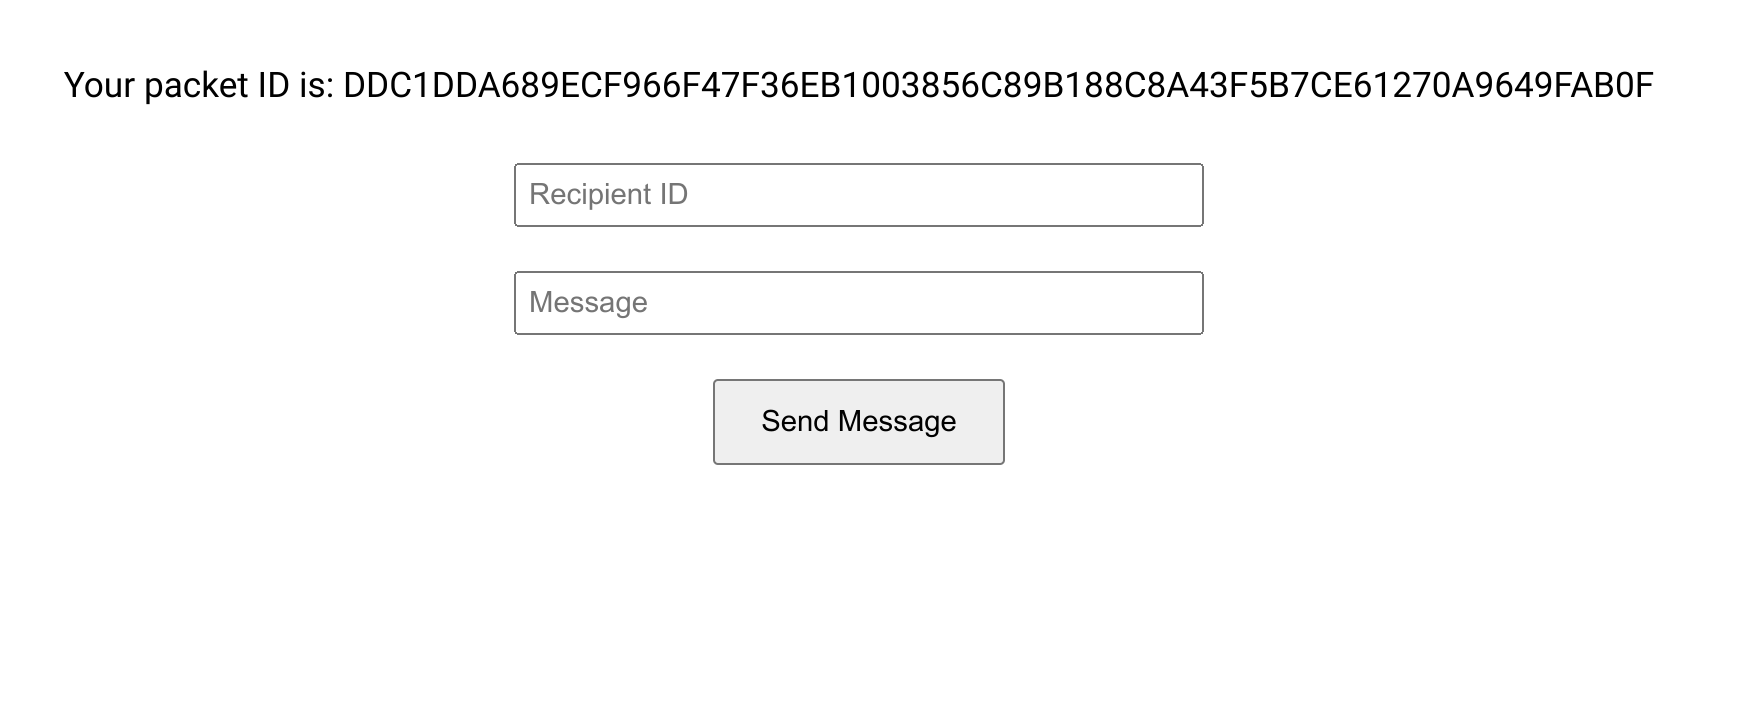
At this stage, the packet is yet to be loaded, indicated by an empty packet ID field. You would need to allow some time for the packet to load. Upon completion, the packet ID is automatically updated, as shown here:
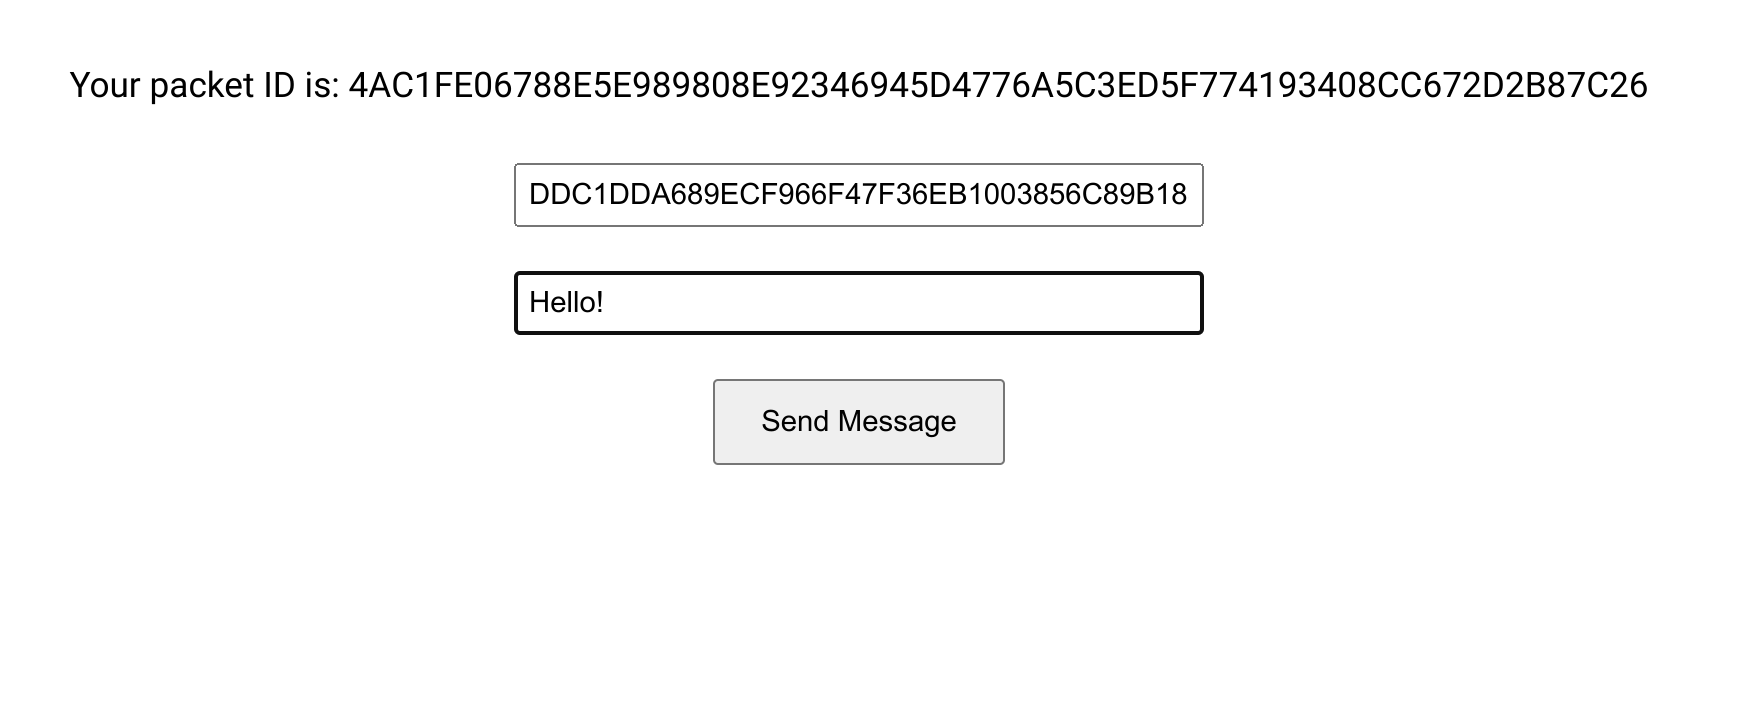
Next, we will demonstrate interaction between two actors. Start by copying the packet ID to your clipboard and open another browser window to load a second actor.
With the second actor loaded, paste the first actor’s packet ID into the appropriate field, type your message, and click Send Message.
Returning to the first actor’s window reveals a yellow notification at the top of the screen, indicating a received message from the second actor.
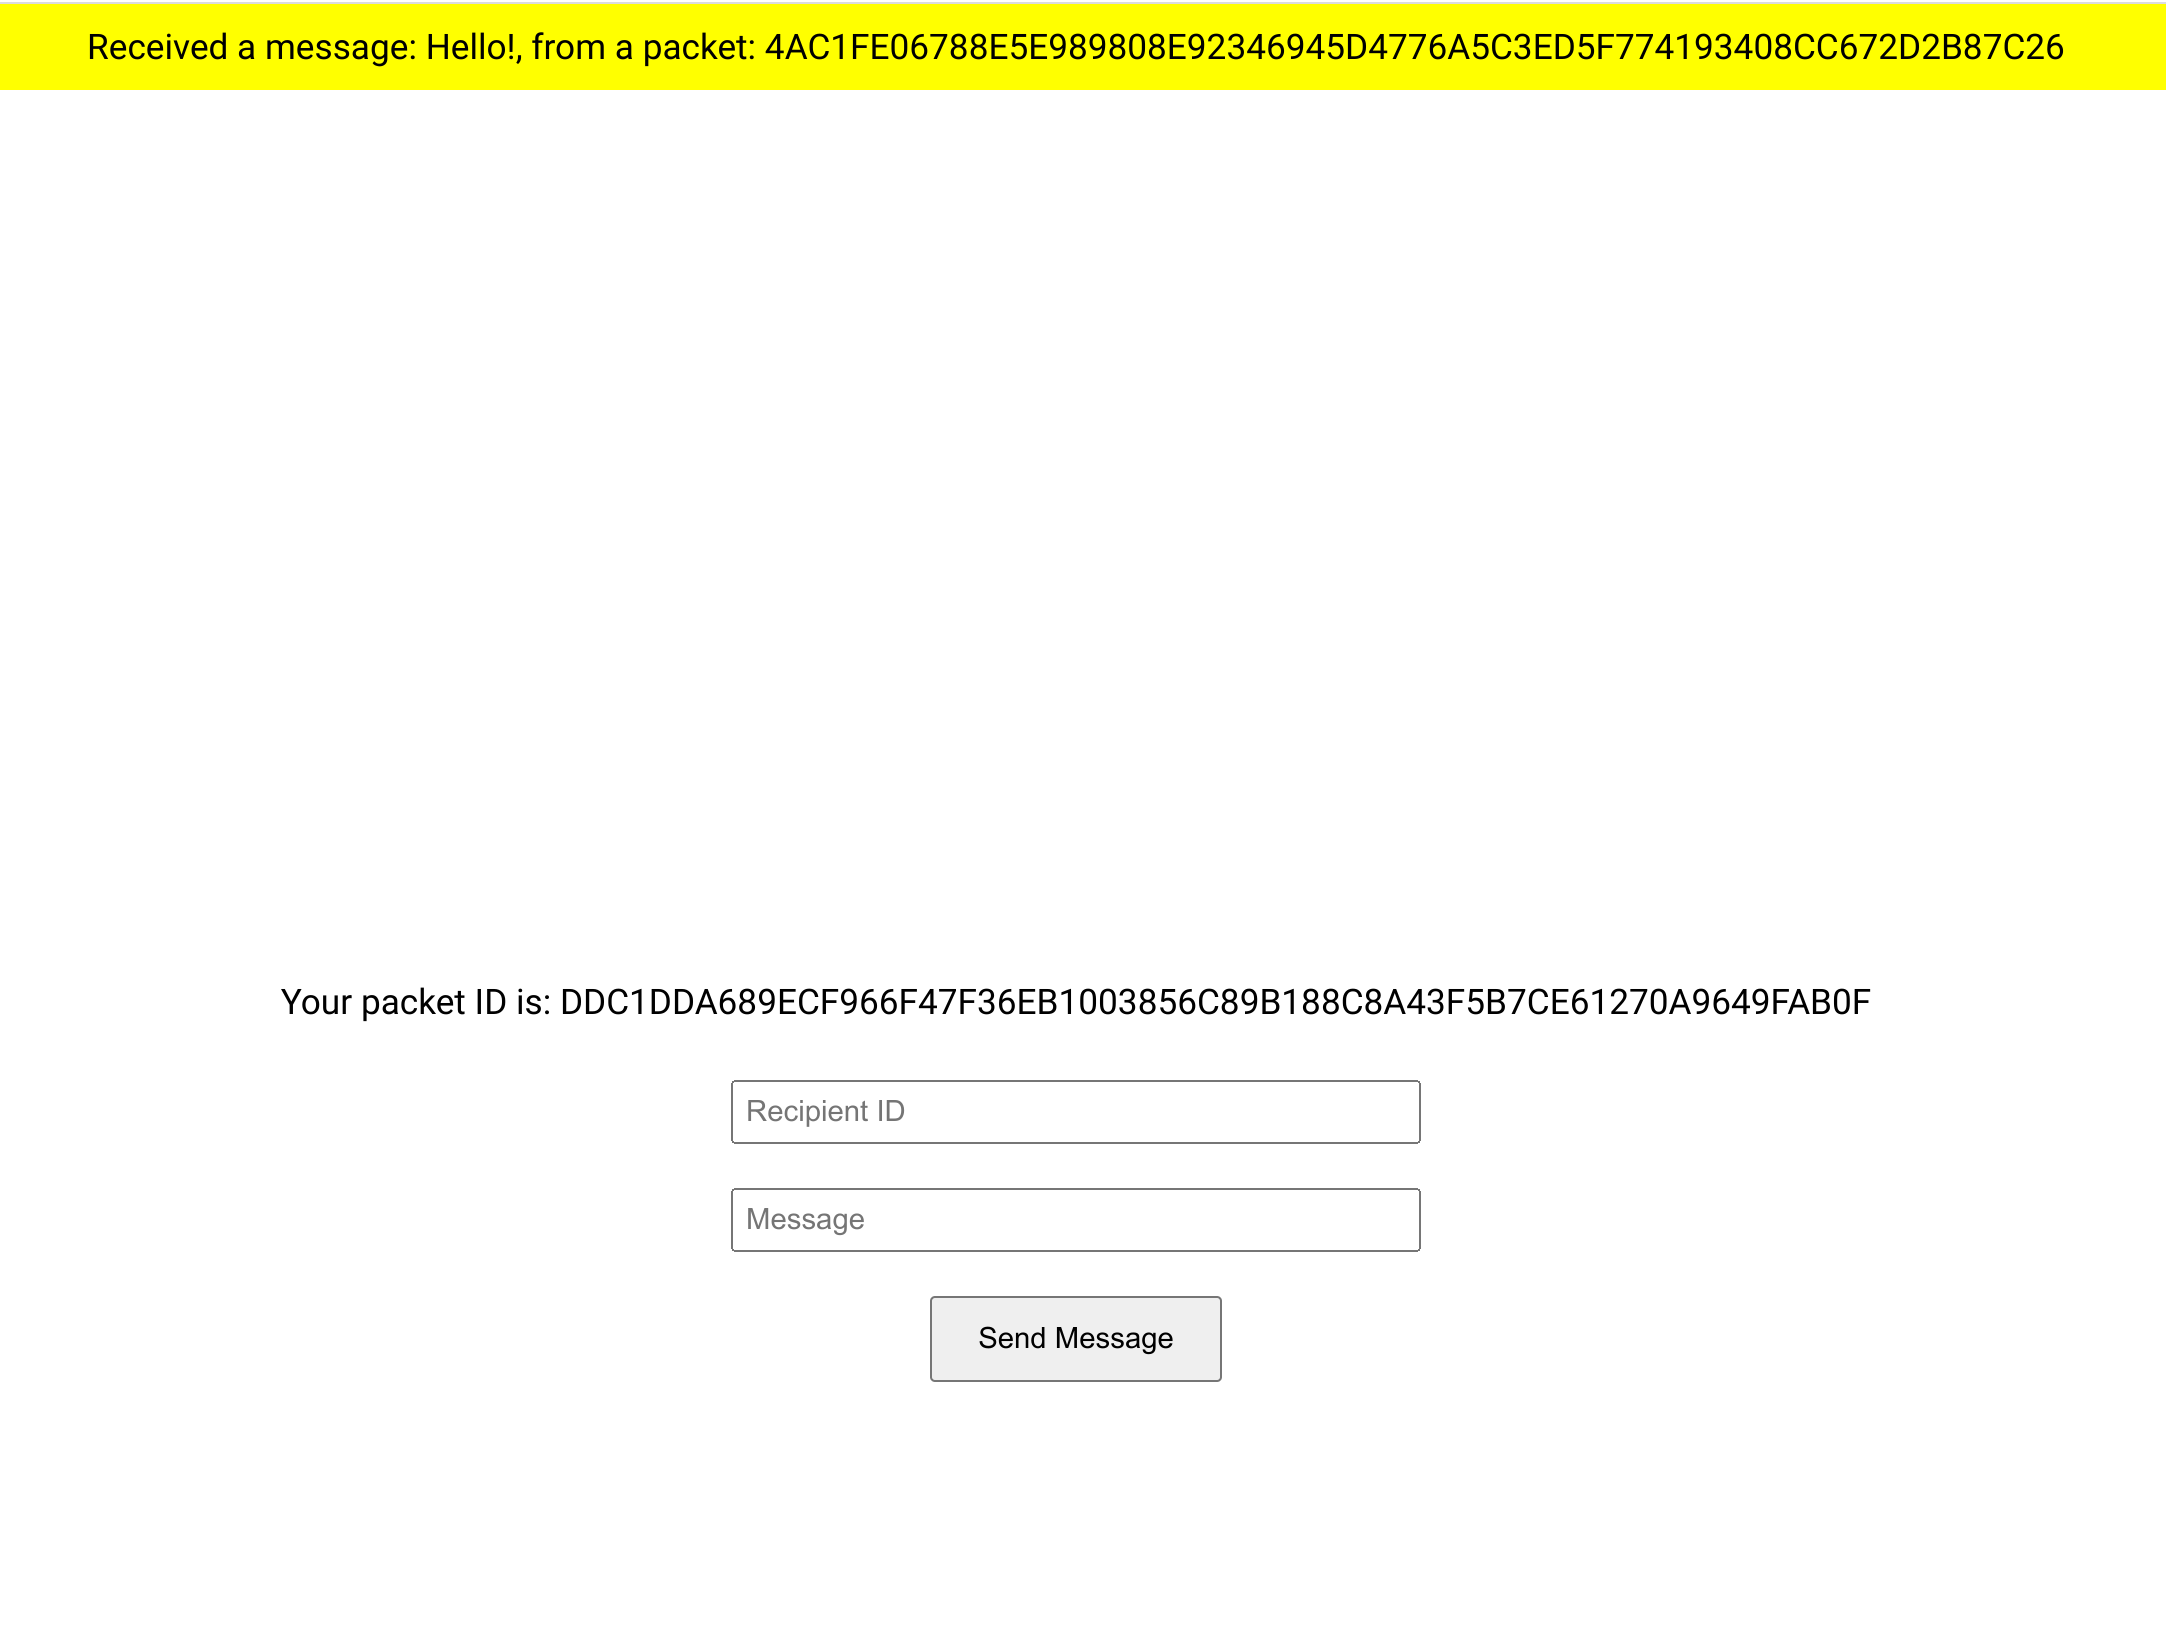
Experiment with the application by adding more actors to your network and exchanging peer-to-peer messages. Messages can be sent from any actor to any other actor within the network.
While developing applications, it is not uncommon to run into runtime errors such as invalid transaction parameters, unrecognized transactions, unexpected transaction sequences due to logic errors, and more. Debugging such issues in complex systems can be challenging. That is why every ADAPT application includes an extensive logging system out of the box to aid debugging.
Each network component produces its own logs. In our application, you can view logs from the message broker (in your terminal) and the ADAPT wrapper (in your browser’s developer console). Logs contain a sequence of messages marked as DEBUG, INFORMATION, WARNING, or ERROR. They also track protocol messages exchanged between different network components, which can be distinguished by their structure.
For instance, here is an example of a DEBUG message:
DEBUG: Processing incoming message: ( "body_wrapper"->
    ( "body"->
        ( "envlp"->
        ( "body"->("name"->"::actor::receive_message","targ"->"Hello!",),
            "from"->"4AC1FE06788E5E989808E92346945D4776A5C3ED5F774193408CC672D2B87C26","ip_document"->%NIL,
            "to"->"DDC1DDA689ECF966F47F36EB1003856C89B188C8A43F5B7CE61270A9649FAB0F",
        ),
        ),
        "from"->"4AC1FE06788E5E989808E92346945D4776A5C3ED5F774193408CC672D2B87C26","message_hash"->%NIL,"nonce"->%NIL,
        "to"->"DDC1DDA689ECF966F47F36EB1003856C89B188C8A43F5B7CE61270A9649FAB0F",
    ),
    "msg_type_id"->"w2b_transaction","protocol_version"->(0->0,1->1,),
)
By contrast, here is what a protocol message looks like:
#### broker <-- broker_client #### w2b_transaction ####
( "body_wrapper"->
  ( "body"->
    ( "envlp"->
      ( "body"->("name"->"::actor::receive_message","targ"->"Hello!",),
        "from"->"4AC1FE06788E5E989808E92346945D4776A5C3ED5F774193408CC672D2B87C26","ip_document"->%NIL,
        "to"->"DDC1DDA689ECF966F47F36EB1003856C89B188C8A43F5B7CE61270A9649FAB0F",
      ),
    ),
    "from"->"4AC1FE06788E5E989808E92346945D4776A5C3ED5F774193408CC672D2B87C26","message_hash"->%NIL,"nonce"->%NIL,
    "to"->"DDC1DDA689ECF966F47F36EB1003856C89B188C8A43F5B7CE61270A9649FAB0F",
  ),
  "msg_type_id"->"w2b_transaction","protocol_version"->(0->0,1->1,),
)
Each protocol message specifies a direction (in this case, broker <-- broker_client) and a message name (w2b_transaction).
For comprehensive information about protocol messages, refer to the messaging protocol page.
By grasping the protocol logic, comprehending the order in which messages are exchanged between components, and meticulously analyzing the logs during error occurrences, you can effectively pinpoint and resolve issues.
Next Steps
Now that you have a solid understanding of building a basic ADAPT project, it is time to dive deeper! In the next part of this tutorial, we introduce a few simple enhancements to the MUFL code, facilitating secure message encryption between all packets in the network. They will demonstrate the implementation of key exchange logic and an end-to-end encryption algorithm.